Access can be enabled for the steps/tabs in the Role Based Access Management module for a particular role in the Other Applications tab.

Note: If access to a step/tab is disabled, the step is non-editable or read-only.
Access can be enabled for the steps/tabs in the Role Based Access Management module for a particular role in the Other Applications tab.
Note: If access to a step/tab is disabled, the step is non-editable or read-only.
If all the steps have ‘Included’ as false in the Access Configuration, then the steps are removed from the User onboarding solution.

Access must be enabled for the Personal Info step for the create operation to be successful.

If access is disabled for the Personal Info step, then record creation is not possible.
Add the below keys to AccessConfiguration's OtherApplications->ChannelData section.

To remove/hide any steps, set the "Included" value to false.
The IsRoleBasedStepAccessEnabled key defined in User Onboarding Json will enable this feature for the entire solution.

If the value of IsRoleBasedStepAccessEnabled is false, step/tab access is not validated.
Issue Cause:
As recommended by Burpsuite security scan, we initially validate the file extension. Since file extensions can be easily altered, and it may not effectively block potentially harmful files.
To overcome this, we also validate uploaded files by checking their file extension signature to see if it matches the signature of an executable file (MZ). But csv or txt file doesn't have extension signature, hence we are using the content of the file to validate it.
If an uploaded CSV file begins with the characters 'M' or 'Z' in its first two characters, the validation identifies it as an executable file, leading to the rejection of the file.


Issue Resolution:
1. Upload CSV files in UTF-8 format, as they have a different file extension signature and won't be identified as an executable file.
2. Ensure that CSV files uploaded have their first two characters different from 'M' and 'Z' to avoid false rejection.
Issue description:
The Export Scheduler Service fails to start when the IsSecure key is set to true, and an exception of type "Internal.Cryptography.CryptoThrowHelper+WindowsCryptographicException" is encountered.
Troubleshooting steps:
To troubleshoot this issue, you can follow these steps:

You may get further help from the OCMExportScheduler_DeploymentGuide section "Creating a certificate and enabling the HTTPS settings to use the certificate".
Issue Cause:
The Export Scheduler service cannot obtain the certificate if the Certificate Path and Certificate Password are set using the "tmc.conf.EXPORTSCHEDULERCertificatePassword" and "tmc.conf.EXPORTSCHEDULERCertificatePath" keys, which are the connector keys in the template.json file. These keys are used when there are multiple instances of the service and are meant for use in High Availability (HA) and shouldn't be used to configure the Primary Service certificate. This results in an "Internal.Cryptography.CryptoThrowHelper+WindowsCryptographicException" exception.


Issue Resolution:
It is essential to configure the Certificate Path and Certificate Password within the configuration file's appropriate keys. The secure binding of the certificate to the primary Export Scheduler service is made possible by these keys. So, it is necessary that the 'Certificate Path' and 'Certificate Password' are precisely specified in the following configuration keys:

For fax report hierarchy is implemented as below
For campaign report hierarchy is implemented as below
This implementation is available since OCM version 4.1.12.30
For email report hierarchy is implemented as below
This implementation is available since OCM version 4.1.3.15
|
Key |
Description |
Possible Values |
|
Id |
Channel ID |
0 |
|
Channel |
Channel name |
Voice |
|
Display |
Display name |
Voice |
|
BaseInteraction |
Base Interaction of the channel |
VoiceInteraction |
|
IsEnable |
To enable/ disable channel |
False |
|
TabCount |
Number of Tab Counts |
0 |
|
Visible |
To make channel visible/ not visible in the module |
True |
|
Operator |
Operator to identify each channel (StartsWith/ EndsWith/ Contains/ Range) |
StartsWith |
|
OperatorValue |
Shorthand Operator value for the Operator |
VO |

To add the new categories in Attribute module can be done using ~/OCM/Configurations/Admin Modules/AttributeCategories.json file as shown below.

|
Key |
Description |
Possible Values |
|
Id |
Id of the Category |
0,1,2,3… so on |
|
Category |
Name of the Category used for storing in table |
|
|
Display |
Name of the Category used for displaying in UI |
|
|
Visible |
To show or hide the Category |
True, false |
// ModuleHierachy is used to filter records in OCM Admin pages based on set org. unit(true/false)//
"ModuleHierachy": "false"

IVR Introductory Module without Module Hierarchy.

IVR Introductory Module with Module Hierarchy.

TUserSessionManager is a component to maintain logged in user session handles timeout and provide the same for any application for authentication purposes.
Step 1: Create the service using Command Prompt as Administrator with below command:
sc create service_name binPath=” full path of TUserSessionManager.exe”
Eg: sc create TetherfiUserSessionManager binPath=” D:\Tetherfi\Apps\ TUserSessionManager.exe”

Step 2: Do the below config file changes to include endpoints for the different user session manager servers in the connector section of appsettings.json file which is present in OCM:

Step 3: In order to enable UserSessionManager service set IsSessionManagerEnabled to “1” and LoginType to “custom” in appsettings.json file.
![]()
UserSessionManagerServerCount indicates number of user session manager server configured.
OCMTimeoutPopupTime indicates the number of seconds to display OCM Timeout popup.

Find TetherfiUserSessionManager Service Deployment guide and Design Document in below SVN paths:
https://docs.tetherfi.com/documentation/tetherfi-user-session-manager-deployment-guide/
https://docs.tetherfi.com/documentation/tusersessionmanagerdesigndocument/
|
Key |
Value |
Description |
|
ReportFilterType |
Na |
if filter type is na, then no hierarchy filter is applied |
|
ReportFilterType |
Team |
if there are 2 supervisors in belongs to one team and they are tagged to some agents or supervisor below them, if team filter is applied then both the supervisor can see each other below level. |
|
ReportFilterType |
Teamsupervisor |
if there are 2 supervisors in belongs to one team and they are tagged to some agents or supervisor below them, if teamsupervisor filter is applied then supervisor can see only his below level teammates |
//Report Filter Type will be used to set report filter based on these values team/teamsupervisor/na
"ReportFilterType": "na"
Issue Description:
The Custom Admin Modules and Reports doesn't load and give 404 -ERROR OCCURED! Page not found error in the UI.
Issue Cause:
If the "IsCustomEnabled" key is disabled in appsettings.json and the Custom DLLs are missed in the Deployed path then the Custom Admin Modules and Reports doesn't load.

Issue Resolution:
1. To enable/ disable Custom Admin Modules and Reports, enable the Key “IsCustomEnabled” in appsettings.json to 1 (enabled)

|
Key |
Description |
Possible Values |
|
IsCustomEnabled |
Enables/Disables Custom Admin Modules and Reports. |
1/0 |
2. Add all the Custom Release to the deployed path.
1. To enable/ disable Custom Admin Modules and Reports, enable the Key “IsCustomEnabled” in appsettings.json to 1 (enabled) or 0 (disabled).

| Key | Description | Possible Values |
| IsCustomEnabled | Enables/Disables Custom Admin Modules and Reports. | 1/0 |
2. Add all the Custom Release to the deployed path.
3. If “IsCustomEnabled” is not enabled and Custom DLL’s are not present then the user interface displays a 404 error for the loaded Custom Module or Report.
To enable or disable the Upload Calling List button in Slot Scheduler enable the key in
~/OCM/Configurations/Admin Modules/SlotScheduler.json file as shown below.
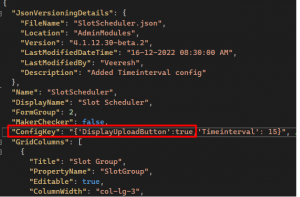
| Key | Description | Possible Values |
| ConfigKey | To enable or display the button | {'DisplayUploadButton':true}
{'DisplayUploadButton':false} |
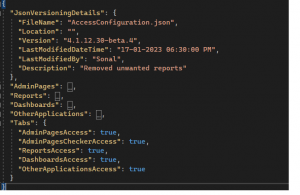
Configure new external dashboard with other OCM dashboard’s can be done using AccessConfiguration.json under Dashboards section in ChannelData .
For example, OCM is hosted in https://dice.tetherfi/OCM then the Url should be https://dice.tetherfi/EXTERNAL_DASHBOARD.
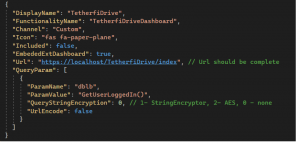
| Key | Description | Possible Values |
| Url | External page url of same origin | https://localhost/TetherfiDrive /application/index |
| EmbededExtDashboard | Is to be set to True if the dashboard is to be loaded from external url | true/false |
| QueryParam | Parameters to be passed along with url | |
| ParamName | Query Parameter Name | For Ex: dblb |
| ParamValue | Query Parameter Value. If value is a method, then it should end with () and multiple values (OR) for single param are passed using | | For Ex: GetUserLoggedIn() |
| QueryStringEncryption | Type of encryption to be used for param | 1 – StringEncryptor
2 – AES 0 – none |
| UrlEncode | Url should be encoded or not | true/false |
Configuration of external application load inside OCM can be done using AccessConfiguration.json.
For example, OCM is hosted in https://dice.tetherfi/OCM then the Url should be https://dice.tetherfi/EXTERNAL_APP.
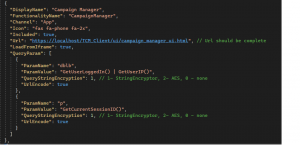
| Key | Description | Possible Values |
| Url | External page url of same origin | |
| LoadFromIframe | Load external page inside OCM using iframe or not | true/false |
| QueryParam | Parameters to be passed along with url | |
| ParamName | Query Parameter Name | For Ex: dblb |
| ParamValue | Query Parameter Value. If value is a method, then it should end with () and multiple values (OR) for single param are passed using | | For Ex: GetUserLoggedIn() |
| QueryStringEncryption | Type of encryption to be used for param | 1 – StringEncryptor
2 – AES 0 – none |
| UrlEncode | Url should be encoded or not | true/false |
To Hide/Display Add Profile Org.Unit to Roles button in Role Based Access Management one can do so using ~OCM\Configurations\Admin Modules\RoleManagement.json file as shown below.
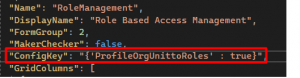
| Key | Description | Possible Values |
| ConfigKey | To Hide or display the “Add Profile Org.Unit to Roles” button in Role Based Access Management module set its value to true or false respectively. | {'ProfileOrgUnittoRoles':true} |
Change the below settings in ~/OCM/Configurations /AccessConfiguration.json file as shown below in order to Display/Hide the tabs from Role Based Access Management.
| Key | Description | Possible Values |
| AdminPagesAccess | To display or hide the Admin Pages tab | True, false |
| AdminPagesCheckerAccess | To display or hide the Admin Pages Checker tab | True, false |
| ReportAccess | To display or hide the Report tab | True, false |
| DashboardAccess | To display or hide the Dashboard tab | True, false |
| OtherApplicationAccess | To display or hide the Other Application tab | True, false |
To add a new level of hierarchy in the Organizational Structure, use the ~/OCM/Configurations/Admin Modules/AgentHierarchy.json file, as illustrated below.

| Key | Description | Possible Values |
| Id | Id of the Hierarchy | 0,1,2,3… so on |
| LevelHierarchy | Name of the Hierarchy | |
| ParentID | Parent Id of the Hierarchy | Values will be the Id of the above Hierarchy |
| FilterType | This is used to set get the Agent Hierarchy | Team, Teamsupervisor, na |
To enable or disable import features button in Agent settings module it can be done using
~/OCM/Configurations/Admin Modules/AgentSetting.json file as shown below.
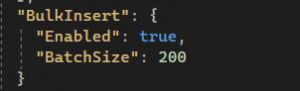
| Key | Description | Possible Values |
| Enabled | To enable or disable the import button in Agent Setting | True, false |
| BatchSize | To split the records of the import data in AuditTrail tab to avoid the size exceed in the table. | Maximum value can be 200 |
IW Interpreter configuration can be done based on channels using ~/OCM/Configurations/Interpreter/InterpreterConfig.json file as shown below.

|
Key |
Description |
Possible Values |
|
Channel |
Channel name. |
voice, chat, email… etc |
|
Display |
Channel name to be displayed in UI. |
Voice, Chat, Email… etc |
|
Visible |
Channel should be visible or not in UI. |
true/false |
|
Url |
IWInterpreterWebApp URL. |
http://xxx.xxx.xxx .xx:xxxxx/ IWInterpreterWeb App/restServices/ |
|
Protocol |
IWInterpreterWebApp protocol type. |
- |
|
CertificatePath |
IWInterpreterWebApp certificate path folder. |
- |
|
GetOrderTakeIntentList |
Method name to get list of intents for order take configuration. |
GetOrderTake IntentList |
|
WriteOrderTakeIntentList |
Method name to update the intent for order take configuration. |
WriteOrderTake IntentList |
|
GetDnisBasedCallCountMap |
Method name to get DNIS based call count map for dashboard. |
GetDnisBasedCall CountMap |
|
GetRoleBasedCall FlowAccessMatrix |
Method name to get IW call flow list along with access based on role. |
GetRoleBased CallFlowAccessMatrix |
|
WriteRoleBased CallFlowAccessMatrix |
Method name to update the IW call flow access based on role. |
WriteRoleBased CallFlowAccessMatrix |
|
GetRoleBased ConfigMasterAccess Matrix |
Method name to get IW master access based on role. |
GetRoleBased ConfigMaster AccessMatrix |
|
WriteRoleBasedConfig MasterAccessMatrix |
Method name to update IW master access based on role. |
WriteRoleBased ConfigMaster AccessMatrix |
|
Key |
Value |
Description |
|
ReportFilterType |
Na |
if filter type is na, then no hierarchy filter is applied |
|
ReportFilterType |
Team |
if there are 2 supervisors in belongs to one team and they are tagged to some agents or supervisor below them, if team filter is applied then both the supervisor can see each other below level. |
|
ReportFilterType |
Teamsupervisor |
if there are 2 supervisors in belongs to one team and they are tagged to some agents or supervisor below them, if teamsupervisor filter is applied then supervisor can see only his below level teammates |
//Report Filter Type will be used to set report filter based on these values team/teamsupervisor/na //
"ReportFilterType": "na"
OCM has exposed some API endpoints which can be used by external applications. To access secure OCM Web API consumer should have api-key which can be generated using client key (site key).
All the client key configured in apiclientkeyregistry.json
|
Key |
Description |
Possible Values |
|
Site |
It contains site base URL of external application. This may include the port.
|
https://ocm.onboarding.com/ apa/.... Here ocm.onboarding is site name localhost:44323
|
|
ClientKey |
Secret Unique Id. This is given to all the site to access the OCM api. This ClientKey used to get ApiKey for api Authorization by calling below ../Generic/apikey?clientkey=12345678 |
73c31ff8-6247-11ec-90d6-0242ac120003 |
To enable Swagger in appsettings.json check true for EnableSwagger
|
Key |
Description |
Possible Values |
|
EnableSwagger |
API details are available in /swagger/index.html
|
true/false |


SaveAction can be configured in ~OCM\Configurations\Admin Modules\ IvrCallBackAnnouncement.json as shown below.


|
Key |
Description |
Possible Values |
|
SaveAction |
Since there is no maker checker functionality enabled for this, always keep SaveAction value as “SaveToChecker” |
"SaveToChecker" |
SaveAction can be configured in ~OCM\Configurations\Admin Modules\ IvrIntroductoryMessageAnnouncement.json as shown below.


|
Key |
Description |
Possible Values |
|
SaveAction |
When maker checker is true keep SaveAction value as Save else it is as SaveToChecker. |
"Save" or "SaveToChecker" |
SaveAction can be configured in ~OCM\Configurations\Admin Modules\ IvrPhraseConfiguration.json as shown below.


|
Key |
Description |
Possible Values |
|
SaveAction |
When maker checker is true keep SaveAction value as Save else it is as SaveToChecker. |
"Save" or "SaveToChecker" |
SaveAction can be configured in ~OCM\Configurations\Admin Modules\ IvrBranchManagement.json as shown below.


|
Key |
Description |
Possible Values |
|
SaveAction |
When maker checker is true keep SaveAction value as Save else it is as SaveToChecker. |
"Save" or "SaveToChecker" |
SaveAction can be configured in ~OCM\Configurations\Admin Modules\IvrHostValueMapping.json as shown below.


|
Key |
Description |
Possible Values |
|
SaveAction |
When maker checker is true keep SaveAction value as Save else it is as SaveToChecker. |
"Save" or "SaveToChecker" |
To add the new feature in TMC Access Management can be done using ~/OCM/Configurations/Admin Modules/TMCAccessManagement.json file as shown below.

|
Key |
Description |
Possible Values |
|
DisplayName |
To display the name of the feature in UI |
|
|
FunctionalityName |
Name of the feature which will be used to store in table |
|
|
Channel |
Name of the Channel |
|
|
Included |
To enable or disable the feature from showing in UI |
|
To add the default values for theme, screen, widget and to enable or disable the tabs in Template module can be done using ~/OCM/Configurations/Admin Modules/AgentTemplateDefaultValue.json file as shown below.

|
Key |
Description |
Possible Values |
|
ThemeOptions |
To add the names of themes to show in Template module |
theme-default,theme-default-2,theme-teal-red,theme-default-dark,theme-blue-grey-dark,theme-pink-grey-dark |
|
ScreenName |
To add the names of the screen to show in Template Screen tab |
Home,HomeAOT,Supervisor, SupervisorAOT, Voice,VoiceAOT,TextChat,TextChatAOT, Email,EmailAOT |
|
Widgets |
To add the names of the widgets to show in Template Screen Widgets tab |
AllInteractions,AHT-Trans-Conf-Count,AUXStatus,InteractionDetails, AgentPerformance |
|
TabName |
To add the name of the tab present in the template module. This will be present under TabView property |
Template, Template Screen, Template Screen Widgets, Template OpHours, Template Features |
|
Include |
To display or hide the tabs in Template module. This will be present under TabView property |
True, false |
|
AgentProfilePictureMax FileSize |
Maximum file size for an agent profile picture in kb. For base 64 profile picture types, this key value has no effect. By default, the maximum size for base 64 is 30 kb. |
30 |
To get the features in Template Feature tab, go to ~/OCM/Configurations/Admin Modules/AgentSettingChannelCount.json file and add “FeatureType” : 1 in “AgentFeature” property as shown in the below screenshot.

To add or remove the Entity Name from the Self Service config can be done using ~/OCM/Configurations/Admin Modules/IVRConfigValues.json as shown below.

To hide the EntityName from the DropDown, we need to remove the block of that EntityName from the Json file. For example if we don’t need Skill EntityName in the module then we need to remove below mentioned block from the json file.

|
Key |
Description |
Possible Values |
|
EntityName |
Name of the Entity |
Skill, IVR or VDN |
|
EntityValue |
Value of the Entity |
|
|
FieldType |
Type of the Field which will be shown in UI |
"DropDown", "Numeric", "TextBox", "TextArea" |
|
Action |
To add the method name to get the dropdown values. This will present under DropDownList property |
|
|
Controller |
Name of the class used for calling Action property. This will present under DropDownList property |
|
|
Key |
This is used for displaying the Parameter values depending on the Entity Name. This will be present under Parameter property |
|
|
Value |
This is used for showing the values based on the key selection. This will be present under Parameter property |
|
To add or remove the Action from Profanity Words can be done using ~/OCM/Configurations/Admin Modules/OpaqueData.json file as shown below.

|
Key |
Description |
Possible Values |
|
ConfigKey |
To add or remove the Action |
|


To send activation link to the user, below configuration keys need to be added in appsettings.json file.
|
Key |
Description |
Possible Values |
|
SelfOnboardUrl |
External Webpage URL for Self onboarding |
https://10.133.146.11/ SelfOnboardingUI/ |
|
SelfOnboardLogo |
Self onboarding email Logo path (should have public access) |
https://10.133.146.11/ OCM_MSSQL/Images/ customerlogo.png |
|
SelfOnboadEmail Template |
Name of the SelfOnboarding Email Template |
UserActivation |
|
EmailManagerService EndPoint |
Email Manger Service Endpoint to send emails |
http://xx.xxx.xxx.xx:xxxxx/ restapi/SendEmail FromExternal |
|
EmailManagerServer CertificateFolder |
Email Manager Certificate folder |
D:\\ |
|
EmailManagerMailboxID |
Email manager mailbox id from which mail is sent for user activation |
test@sample.onmicrosoft .com |
|
EnableEMMService |
Send Mail based on EMM or SMTP, true then mail through EMM false through smtp |
true/false |
|
fromAddress |
Username of the sender for SMTP |
test@tetherfi.com |
|
password |
Password of the sender for SMTP |
password |
|
SMTPServer |
SMTP Server |
Mail.tetherfi.com |
|
Port |
SMTP Port Number |
25 |
|
SSL |
SSL Enabled or Disabled for SMTP |
true/false |
https://tetherfi-pte-ltd.atlassian.net/l/c/nVp6W8iD
|
Key |
Description |
Possible Values |
|
Title |
Display name to be shown in OCM |
Transaction |
|
PropertyName |
Actual Property name |
Transaction |
|
Editable |
To make Property editable or not |
true |
|
ID |
Column ID |
id |
|
FormGroup |
Number of Form groups |
2 |
|
Hidden |
To make property hidden |
true |
|
Width |
Bootstrap column width |
Col-lg-4 |
|
Encoded |
To make HTML encode true / false |
true |
|
ClientTemplate |
To add client template method |
- |
|
Mandatory |
To make if column is mandatory or not |
true |
|
FieldType |
Field Type of the column |
numeric |
|
IncludeGrid |
To include grid or not |
|
|
DateFormat |
To specify the date format |
{0: dd/MM/yyyy HH:mm:ss} |
|
IsDuplicateAllowed |
To specify if duplicate records are allowed or not |
true |
|
MaxLength |
To specify the max length of inputs |
20 |
|
Width |
To specify the actual width of column |
200 |
|
OnKeyUpEvent |
To add a On Key Up Keyboard event method |
- |
|
OnMouseOutEvent |
To add a mouse out event method |
- |

|
Key |
Description |
Possible Values |
|
DisplayName |
Display name to be shown in OCM |
TMAC |
|
FunctionalityName |
Actual Functionality name |
TMAC |
|
Included |
To Include/ not include in the OCM |
true |

|
Key |
Description |
Possible Values |
|
DisplayName |
Display name to be shown in OCM |
Fax Address Book |
|
FunctionalityName |
Actual Functionality name |
FaxAddressBook |
|
Channel |
Channel to which the Channel Data should belong to. |
Fax |
|
Icon |
Icon to display in OCM |
far fa-address-book fa-2x |
|
Included |
To Include/ not include in the OCM |
true |
